RESIDENTIAL SOLAR INSTALLATION

Residential Solar Installation
Residential solar energy systems are becoming an increasingly popular choice for homeowners looking to reduce energy bills, lessen their environmental impact, and invest in sustainable energy solutions. A solar energy system for a home typically consists of solar panels, inverters, and other equipment designed to convert sunlight into usable electricity. With advancements in technology and various incentives, solar power has become more accessible and cost-effective for homeowners.
In this guide, we will explore the key components, installation process, benefits, and considerations for residential solar installation.
1. Key Components of a Residential Solar System
A residential solar installation typically involves several key components, all working together to harness solar energy and convert it into electricity for use in the home:
1.1. Solar Panels
- Photovoltaic (PV) Panels: These panels are made up of solar cells that convert sunlight directly into electricity through the photovoltaic effect. The number of panels installed depends on the energy needs of the household and the available roof space.
- Monocrystalline vs. Polycrystalline:
- Monocrystalline Panels: Made from single-crystal silicon, they are more efficient and typically have a higher power output per square meter, but they can be more expensive.
- Polycrystalline Panels: Made from silicon crystals that are melted together, these panels are less expensive but also less efficient than monocrystalline panels.
- Thin-film Panels: These are lightweight, flexible panels that can be integrated into various surfaces but are generally less efficient than crystalline silicon panels.
1.2. Inverter
The inverter is responsible for converting the direct current (DC) electricity generated by the solar panels into alternating current (AC) electricity, which is used by most household appliances. There are several types of inverters:
- String Inverters: This is the most common type of inverter, which connects multiple solar panels together into a single string. It converts the electricity from the entire string at once.
- Microinverters: These are small inverters installed on each individual panel, allowing each panel to operate independently. Microinverters improve system performance, especially in shaded areas.
- Power Optimizers: These are used in conjunction with a string inverter. They optimize the performance of each panel by mitigating the effects of shading or dirt on individual panels.
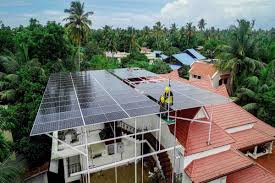
1.3. Mounting System
Solar panels need to be securely attached to the roof or ground to ensure optimal performance. The mounting system is designed to hold the panels in place and tilt them at the correct angle to maximize sunlight exposure.
- Roof-Mounted Systems: These are the most common installations, where the panels are fixed to the roof using brackets and rails.
- Ground-Mounted Systems: If roof space is limited or not suitable, solar panels can be installed on the ground, often in a dedicated space like a backyard or open area.
- Adjustable Mounting: Some systems allow for manual or automatic adjustments to the angle of the panels, optimizing them for seasonal changes in sunlight.
1.4. Battery Storage (Optional)
To maximize the benefits of solar energy, many homeowners choose to install a battery storage system that stores excess energy generated during the day for use at night or during cloudy days.
- Types of Batteries: The most common types of batteries for residential solar systems are lithium-ion and lead-acid. Lithium-ion batteries are more expensive but last longer and are more efficient.
- Energy Independence: With battery storage, homeowners can become less reliant on the grid, increasing energy independence and reducing their reliance on utility power during peak hours or outages.
1.5. Monitoring System
Modern solar systems often come with a monitoring system that allows homeowners to track energy production, consumption, and performance in real-time.
- Mobile Apps and Online Portals: Many solar installers provide apps or online platforms to help homeowners monitor their energy generation and make adjustments as necessary.
- Data and Alerts: These systems can also alert homeowners to potential problems, such as a drop in panel performance, making maintenance and troubleshooting easier.
2. Steps in Residential Solar Installation
2.1. Initial Assessment and Consultation
The process begins with an assessment to determine if solar energy is a viable option for the home. During the initial consultation, the installer will:
- Evaluate the Roof: The installer will assess the roof’s size, orientation, and condition to ensure it’s suitable for solar panel installation.
- Assess Energy Needs: The homeowner’s energy consumption history is analyzed to determine how much energy the home uses and how much solar energy would be required to meet that demand.
- Roof Space and Shading: The roof’s exposure to sunlight is assessed. Shading from nearby trees, buildings, or other obstacles can reduce the efficiency of the system.
2.2. System Design and Proposal
Once the initial assessment is complete, the solar installer will design a custom solar system tailored to the homeowner’s needs. This includes:
- System Size and Panel Count: The number of panels required based on energy usage and roof space.
- Type of Equipment: Choice of panels, inverters, and mounting systems.
- Financial Proposal: A detailed proposal outlining the cost of installation, potential savings, available rebates, incentives, and financing options.
2.3. Permits and Approvals
Before installation can begin, the installer will typically need to obtain the necessary permits from local authorities. This ensures that the installation complies with local building codes and zoning laws. Some of the required permits might include:
- Electrical Permit: For connecting the solar system to the electrical grid.
- Building Permit: For mounting panels on the roof.
- Homeowners Association (HOA) Approval: If applicable, some communities may have restrictions on solar panel installations.
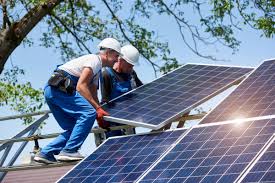
2.4. Installation Day
The installation process typically takes 1-3 days, depending on the size and complexity of the system. The steps include:
- Roof Mounting: The mounting system is installed and secured to the roof.
- Panel Installation: Solar panels are placed and connected to the mounting system.
- Inverter Setup: The inverter(s) are installed, and the electrical connections between the panels and the inverter are made.
- Wiring: The system is connected to the home’s electrical system, and, if applicable, a battery storage system is installed.
2.5. System Inspection and Testing
Once the system is installed, it will undergo a final inspection to ensure it meets all safety and regulatory standards. The installer will also perform functionality tests to ensure the system is working as expected.
- Grid Connection: If the system is grid-tied, the installer will ensure it is connected to the utility grid and any net metering arrangements are set up.
- Monitoring Setup: The monitoring system is configured, and the homeowner is shown how to track performance.